
General use for Dishwasher
Throughout the branches the models of dishwasher will vary as well as there being 2 different types in service see photos below. one is the conveyor rack version and one is the pull down version for detailed instructions I have provided manuals for the 2 most common models within the maintenance section. Below is a general set of procedures that should cover both types.
Opening:
-
Ensure the water tank has been emptied the previous night and has all been put back together correctly
-
Check for anything stuck or caught in the machine
-
Check that the rinse aid and washing liquid are not empty
-
Switch on the power to the machine locating the main power on switch on the wall
-
Switch on the machine at the main switch on the machine at this point in some cases it should automatically fill and heat the water, some cases you will need to turn the dial to fill then it will automatically fill the tank to the right limit, you will then need to tourn the dil to on so that it will now heat up and operate (correct temps are 65c for the pre-wash and 82c for the final rinse)
-
Once the tanks have reached temperature the machine can be operated
-
Pre clean the plates in the sink and rinse clean then insert into the racks and depending if the machine is pull down or conveyor begin the cycle
-
With the conveyor machine you will need to press a button to begin the process whereby it will pull the rack of dishes through the machine cleaning them and rinsing them then depositing them out at the other side
-
With the pull down versions it will start when you slide in the rack and pull down the hood cover, you should then leave the machine to work until the hood automatically releases then pull through the rack
-
Allow the dishes to air dry before stacking away ready for polishing and use
-
During use care must be taken to pull out any fallen cutlery that may have come loose and potentially cause harm to the machine
-
Care must also be taken as the trays come out of the other side of the machine that they are not banging into other trays and potentially damaging plates in the case of the rack models this can have further consequences causing the machine to back up and again cause potential damage to the machine and its components
Closing:
-
Switch off the machine both at the wall and on the machine
-
Pull out the drain plug in the inside of the machine usually under the mesh panel let all water drain out of the tank, this could also be on the switch where you switch the switch over to drain and it will automatically pump and drain the machine.
-
Empty the mesh bucket of collected debris and put back
-
Using a bucket of water rinse out the tank so as it is nice and clean
-
Ensure machine is all wiped down and clean and that the wash aid and rinse aid are not empty
General instruction for dishwasher procedure:
Routine:
-
Trollies will come in with stacked plates, trays of dirty cutlery, trays of food waste and trays of paper napkins skewers and general waste
-
Empty the general waste into the general waste bin, if dirty rinse out with spray hose on sink
-
Empty the food waste either into the food grinder or if none present into the delegated food waste bin, if dirty rinse out with spry hose on sink
-
Take of box of cutlery and stack to one side
-
Lift off plates and bowls and wash through first sink using sponge and washing up liquid (a quick wipe is all that is required as the dishwasher itself will thoroughly clean the plates this, procedure is just to remove any heavy waste build up)
-
Pass the plates and bowls through the second rinse sink
-
Carefully now stack the plates and bowls on the racks and pass through the dishwasher
-
For the cutlery empty into the mushroom boxes placed into the racks, remove any waste food that have got caught into together, then pass through dishwasher. Note: the cutlery tray on the trolley should contain water with washing up liquid to soak the cutlery before it comes into the kitchen porter department, this water will need to be drained off, before putting the cutlery onto the rack to avoid water going everywhere.
-
Once passed through the machine allow to air dry for minimum 1 min
-
Put all crockery etc away and cutlery is now ready to go through cutlery polisher (must be still wet when going through polisher for best results)
Notes:
-
Use empty mushroom trays inside the normal cutlery rack trays to hold cutlery safely (cutlery can easy slip through the holes on the normal trays, causing potential damage to the machine)
-
Always allow the finished dishes a minute to air dry before putting away
-
Ensure to always check the dish washer liquid and liquid rinse replace as required (if using too much then there could be a problem on the pump of the machine, report to supervisor asap)
-
If the machine is being used heavily try to do a water change of the main tank when it quiets down to ensure that the plates are being cleaned efficiently
Pot wash
Within most branches there are also a further 2 deep sinks for washing all the buffet trays and various pots and pans.
-
Pots, pans trays etc should be scraped into a food waste bin then stacked ready for cleaning
-
Items are first scrubbed and cleaned through the first sink containing hot water and washing up liquid
-
Then passed through the rinse sink
-
Then removed and put through dishwasher
-
Once dry the trays should be taken immediately back to the kitchen and stacked in the correct places as they will be needed
-
In the case of plastic tubs etc these should be cleaned the same way then taken back to the correct storage place
Cleaning Dishwasher
As well as cleaning the dishwasher ensure to keep all floors clean and dry as much as possible at all times, shelves will need regular cleaning as well as cupboards and draws.
Nightly procedure (both)
-
Switch off the machine both at the wall and on the machine
-
Pull out the drain plug in the inside of the machine usually under the mesh panel let all water drain out of the tank, this could also be on the switch where you switch the switch over to drain and it will automatically pump and drain the machine.
-
Empty the mesh bucket of collected debris and put back
-
Using a bucket of water rinse out the tank so as it is nice and clean
-
Ensure machine is all wiped down and clean and that the wash aid and rinse aid are not empty
As well as the normal nightly clean down procedure the dishwasher will need a deep clean dependent on use every 2 weeks or once per week depending on volume.
See deep cleaning procedures below:
Deep Cleaning procedure for rack dishwasher
-
Push the Conveyor OFF button, conveyor and wash stop.
-
Turn the program selector switch to "Drain" position. The machine will be emptied. Exhaust and heaters stop automatically.
-
When all tanks are completely emptied, set the selector switch back to "0" position.
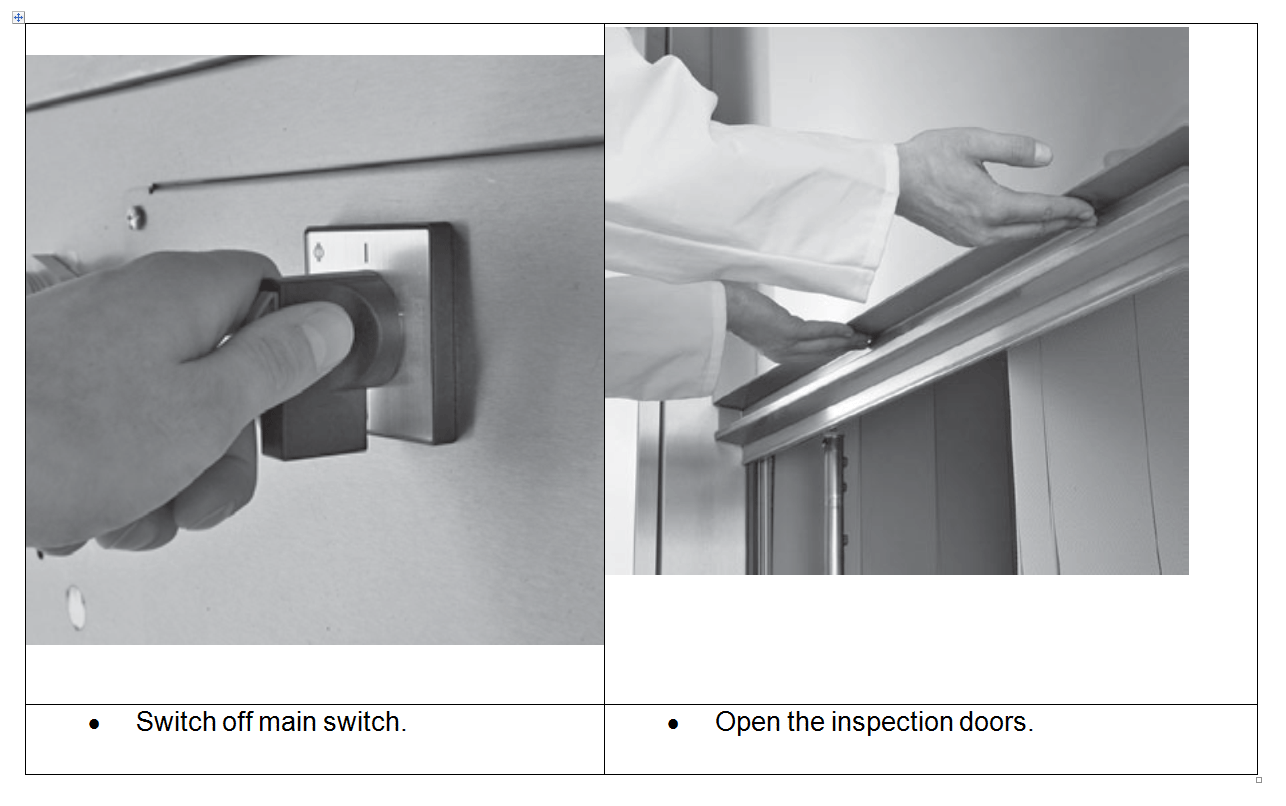
-
Switch off main switch.
-
Open the inspection doors.
-
Take out and clean curtains.
-
Remove wash arms: Upper: Lift wash arm over stop unit and pull out.
Lower: Lift wash arm to pull out.
-
Remove end caps and clean wash arms accurately.
-
Remove rinse arms: Upper: pull spring towards front and remove rinse arm. Lower: lift rinse arm and pull out. Control nozzle openings and clean if necessary.
-
Remove strainer baskets.
-
Remove flat strainers
-
Remove rinse strainer
-
Remove pump intake strainer (rinse section)
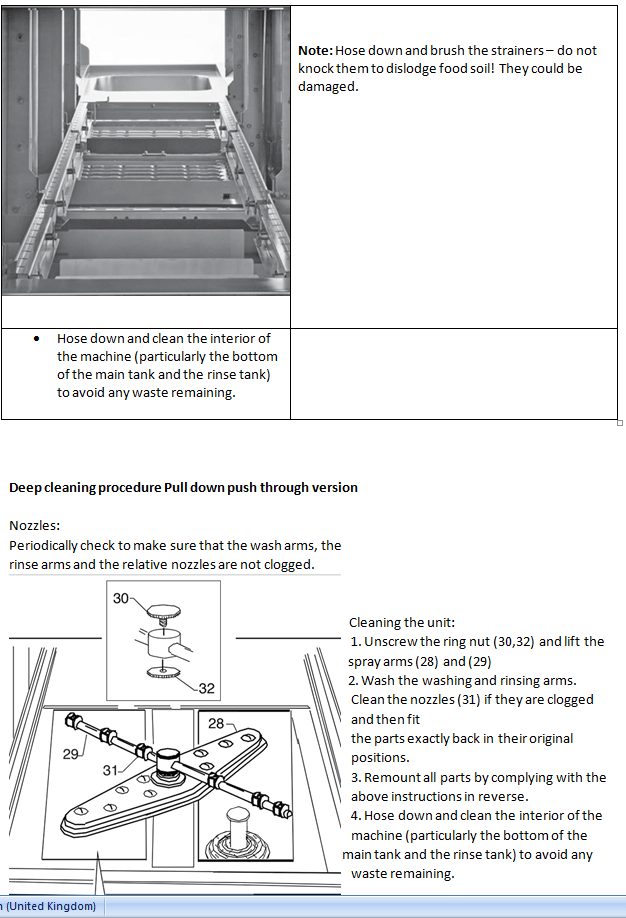
Note: Hose down and brush the strainers – do not knock them to dislodge food soil! They could be damaged.
-
Hose down and clean the interior of the machine (particularly the bottom of the main tank and the rinse tank) to avoid any waste remaining.
Deep cleaning procedure Pull down push through version
Nozzles:
Periodically check to make sure that the wash arms, the
rinse arms and the relative nozzles are not clogged.
Cleaning the unit:
1. Unscrew the ring nut (30,32) and lift the spray arms (28) and (29)
2. Wash the washing and rinsing arms. Clean the nozzles (31) if they are clogged and then fit
the parts exactly back in their original positions.
3. Remount all parts by complying with the above instructions in reverse.
4. Hose down and clean the interior of the machine (particularly the bottom of the main tank and the rinse tank) to avoid any waste remaining.